laams_push 1.1.0  laams_push: ^1.1.0 copied to clipboard
A declarative URI-based router for advanced navigation in Flutter, tailored for deep linking, user auth-based navigation, custom transition animations, ease of use, and many more.
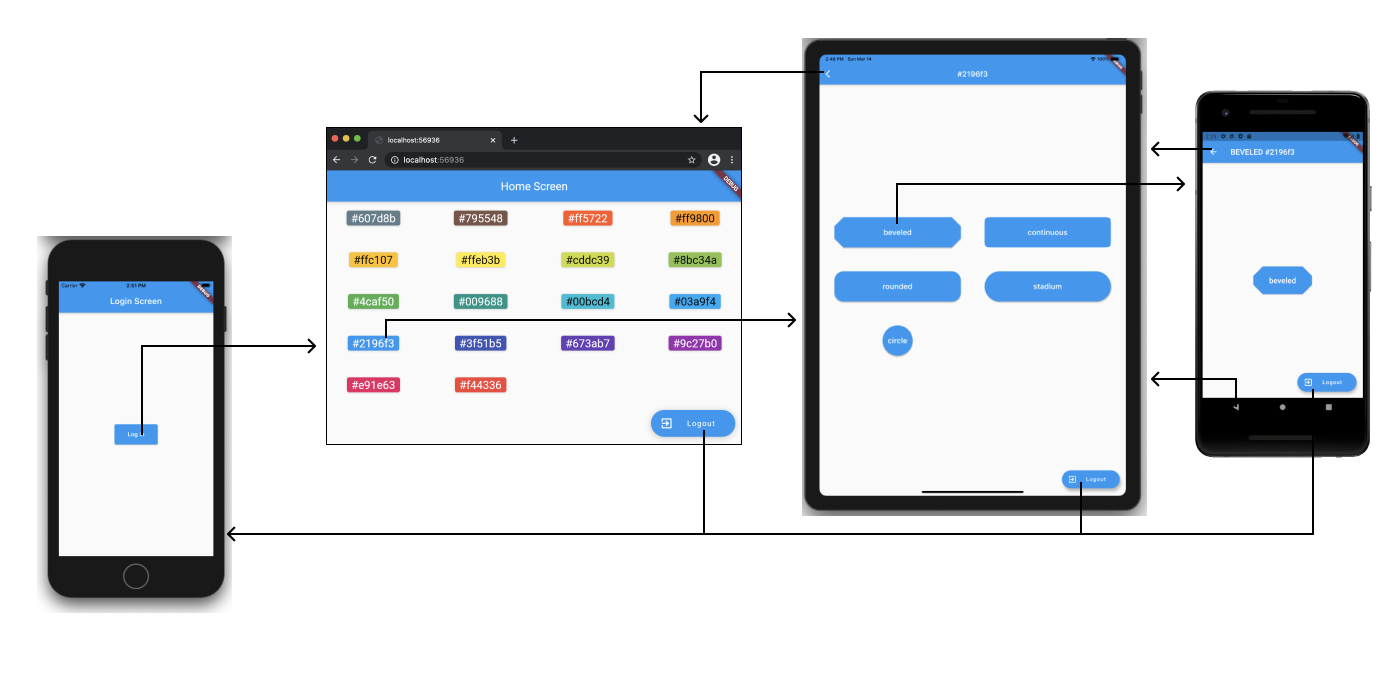
Image Source: [Google
Overview #
We have created the most effortless and easy-to-use routing solution for Flutter built on top of Navigator 2.0. The goal of laams_push is to make all the advanced functionalities of navigation in Flutter easy to use. We have developed a declarative URI-based router for advanced navigtion in Flutter. laams_push functionalities include but are not limited to deep linking, authentication based navigation, custom route transition animation and many more.
This is the syntax of a URI:

Features #
- Deep linking
- Navigation based on user authentication state
- Custom animations for navigation transition
Getting started #
- Add the
laams_pushtopubspec.yamlunderdependenciessection in your flutter project.
dependencies:
  laams_push: <latest>
And copy and past the example solution from the [example] tab. We have used provider for simple state management of the example app, you should add provider as a dependencies for the app to work.
Note: laams_push itself does not have any third-party dependencies.
Usage #
All you have to do is:
1. Add LaamsPushApp.router instead of MaterialApp.router at the top of your widget tree. LaamsPush.router is just a wrapper around MaterialApp to make laams_push navigation setup completely effortless for you. This widget has five required properties which you should instantiate. #
Here is an example:
void main() => runApp(MyApp());

class MyApp extends StatelessWidget {
  const MyApp({Key? key}) : super(key: key);

  @override
  Widget build(BuildContext context) {
    final userBloc = context.watch<UserBloc>();
    return LaamsPushApp.router(
      isUserSignedIn: userBloc.isSignedIn,
      theme: ThemeData.light(),
      title: 'Laams Router Application',
      publicRoutes: const [SignInScreen.name, NotAllowedScreen.name],
      onGeneratePages: (LaamsRoute route) {
        switch (route.name) {
          case HomeScreen.name:
            return LaamsPage.fromRoute(route, const HomeScreen());
          case SignInScreen.name:
            return LaamsPage.fromRoute(route, const SignInScreen());
          case ProductsScreen.name:
            return LaamsPage.fromRoute(route, const ProductsScreen());
          case ProductDetail.name:
            final product = Product.fromJson(route.query!);
            return LaamsPage.fromRoute(route, ProductDetail(product));
          case NotAllowedScreen.name:
            return LaamsPage.fromRoute(route, NotAllowedScreen(route));
          default:
            return LaamsPage.fromRoute(route, NotFoundScreen(route));
        }
      },
    );
  }
}
isUserSignedIn: displays ascreenbased on the user signed in status. You can provide the signed in status of the user using any of the available state management solutions. We have useproviderin our example project, since it is easy to setup for smaller apps.onGeneratePages: maps [LaamsRoute] to [LaamsPage]. Think of it asonGenerateRoutesinside flutterMaterialApp. You instantiate your screens based on theroute.name. Make user to add anotfoundroute as the default.publicRoutes: By default, all of the routes are protected, meaning a user who is not signed in cannot access any of the routes, except the public routes. list names of all your public routes here.
2. Use any of these methods from any part of your Widget tree: #
 // Or:
 () => LaamsPush.push(context, '/settings');

 // Or:
 () => LaamsPush.reset(context, '/home');

 // Or:
() => LaamsPush.replace(context, '/products');

 // Or:
 () => LaamsPush.remove(context, '/settings');

 // Or:
 () => LaamsPush.pop(context);
LaamsPush.push: pushes a route on top of the current route.LaamsPush.reset: reintializes the route stack with a new route.LaamsPush.replace: replaces the current route with a new route, without changing the rest of routes stack.LaamsPush.remove: removes a route if it is behind or on top of the current route.LaamsPush.pop: pops the current route.
When calling any of the above methods you can pass more arguments: #
For Example:
  LaamsPush.push(
    context,
    '/settings',
    animationDuration: 300,
    animationType: AnimationType.slideDown,
    query: <String, dynamic>{
      'productID': 123,
      'productName': 'T-Shirt',
      'imageURL': 'https://www.example.com/image.jpg'
    },
    fragment: 'second-section',
    arguments: 'productID',
    state: 'any state',
  );
context:LaamsPushusesBuildContextto find the the ancester Router's delegate, and call its methods.name: isLaamsRoute.namevalue which is instantiated after you call one of the aforementioned, cached and then returned back as a parameter ofonGeneratePagesinsideLaamsPushApp.router. You don't have to know how it works. All you have to know is this ispathor name of thescreenthat you can to display.animationDuration: The amount of time it should take inmilisecondsto navigate to the new route.animationType: The type of animation used when transitioning from one route to the other.AnimationType.slideDown, for instance, pushes the new route in the stack, while being dropped down from top to bottom.query: This is our recommended solution for passing data from one screen to the other. Pass your data asMap<String, dynamic>and it receive in the nextScreenas an argument. Look at the product details section and products list page in our example project.fragment: this is equivalent to#fragmentin the Uri, you can use this to navigate to a particular part of the new screen.arguments: is passed toRouteSettings, it is not safe, we do not recommend using it, as Flutter cannot cache the data or the widget when you are passing to it, and will emit error, if you, for example, use the arrow buttons of your browser.state: is passed toLaamsRouteParserfor other browsing history caching mechanism. you do not have to useargumentsorstate. Usequeryandfragmentinstead, and letlaams_pushhandle the rest.
Note: you do not have to know how any of these work. Just use them and they will work like a charm out of the box.
Advanced Usage: #
If you opt out of LaamsPushApp.router, You can use the following classes to setup everything on your own.
LaamsPushState: a class which usesChangeNotifierto keep track of theroutes stack.LaamsRouteParsera class which parsesLaamsRoutefor Os configurations.LaamsRouteMapper: convertsLaamsRouteto Uri and back.LaamsRoute: you can extend it to add more functionalities for passing data from one widget to other. It holds the configurations forLaamsPageLaamspage: it extendsPage<T>and holds configurations for a route, which is then used forNavigator's route stack inside aRouter.LaamsRouterDelegate: It brings everything together. you can use it inMaterialApp.routerorRouter.delegate.
You do not have to use any of these. If you are using a CupertinoApp or a WidgetsApp, then, have a looke at LaamsPushApp.router implementation for better understanding, and reimplement that in your app, with all the functionalities that laams_push provides for you out of the box.
Best Practices: #
- Use
LaamsPushApp.routerand have everything work for you out of the box. - Declare the name of your routes as a static const variable inside the widget that you want to display. for instance if you have a widget as your home screen and the name is
/home, this is how you name it.
class HomePage extends StatelessWidget {
  // name of the route:
  static const String name = '/home';
  const HomePage({Key? key}) : super(key: key);

  @override
  Widget build(BuildContext context) {
    return Scaffold(
      appBar: AppBar(title: const Text('Heme Page')),
    );
  }
}
This way, you can use the name of your route anywhere by calling: HomePage.name.
// When calling a buttons `onPressed` method:
onPressed: () => LaamsPush.push(context, HomePage.name);

// Or in `onGeneratePages`:
if (route.name == HomePage.name){
  return LaamsPage.fromRoute(route, Homepage());
}
Maintainers #
Metadata
Publisher
Weekly Downloads
Metadata
A declarative URI-based router for advanced navigation in Flutter, tailored for deep linking, user auth-based navigation, custom transition animations, ease of use, and many more.
Homepage
Repository (GitHub)
View/report issues
Documentation
License
![]() MIT (license)
MIT (license)